
How to Mark Barcodes on Metal Without Losing Scanning Accuracy

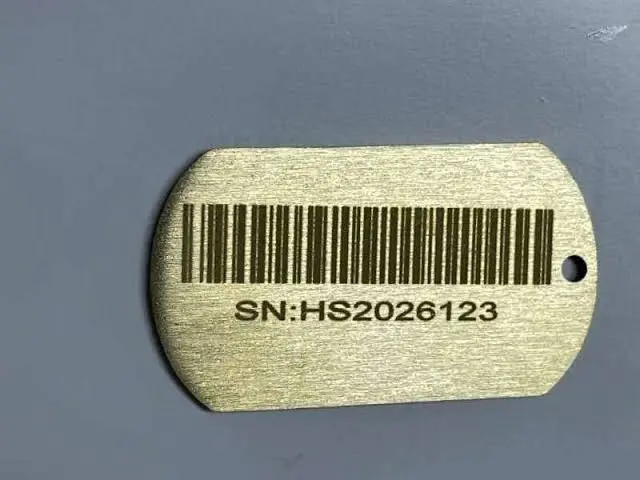
A barcode on a printed label is easy to scan. A barcode on a piece of metal is a different story.
Metal is shiny, curved, rough, or oily. The mark itself may be shallow, dark gray on silver gray, or just a slightly different texture. A scanner that reads a black-and-white label in a split second may struggle to read the same code marked on a steel tool or aluminum part.
But laser-marked barcodes are worth the effort. They are permanent, they do not peel or fade like labels, and they stay with the part for its entire life. They are used in factories, tool rooms, medical device production, electronics, jewelry, and many other places where traceability matters.
The key is to mark them in a way that scans reliably, every time. In this guide, you will learn how to mark barcodes on metal without losing scanning accuracy, from choosing the right barcode type to setting up your fiber laser, testing, and fixing common problems, all in plain and simple language.
Why Barcodes on Metal Fail to Scan
Before looking at solutions, it helps to understand what usually goes wrong. Most failed scans come from one of these problems.
- Low contrast. The marked areas do not look different enough from the unmarked areas.
- Bars or modules that are too small. The laser cannot mark them cleanly, or the scanner cannot see them.
- Heat spread. Heat from the laser makes bars wider than designed, so gaps close up.
- Poor focus. The laser spot is too large, giving blurry edges.
- Rough or uneven fills. Stripes or patchy areas confuse the scanner.
- Glare and reflections. Shiny metal bounces light into the scanner and washes out the code.
- Curved or uneven surfaces. The code distorts or goes out of focus.
- Missing quiet zone. Other marks or edges are too close to the code.
- Wrong code type or size for the scanner.
- Damage after marking, such as polishing, plating, or wear.
Each of these can be fixed with good design, good settings, and good testing.
1D vs 2D Barcodes: Which Should You Mark?
There are two main families of barcodes, and the choice matters a lot for metal parts.
1D (Linear) Barcodes
These are the classic barcodes made of parallel vertical lines of different widths. Common types include Code 128, Code 39, EAN, and UPC.
Advantages:
- Widely recognized and supported by many scanners
- Simple structure
- Easy for basic laser scanners to read
Disadvantages:
- Needs a lot of space, because the code is long and thin
- Sensitive to damage, since a scratch across the bars can break the code
- Holds little data
- Needs good, consistent bar widths, which can be hard to achieve on metal
2D Barcodes
These store information in a grid of small squares or dots. The most popular types are Data Matrix and QR codes.
Advantages:
- Very compact, so they fit on small parts
- Hold much more data
- Built-in error correction, so they can still scan when partly damaged or dirty
- Readable from any direction
Disadvantages:
- Need camera-based scanners or phones, rather than simple laser scanners
- Small modules still need careful marking
Which One Should You Choose?
- Small metal parts: 2D codes, especially Data Matrix, are usually the best choice
- Customers scanning with phones: QR codes
- Existing systems that only read 1D codes: 1D codes such as Code 128
- Industrial traceability: Data Matrix is very common
- Mixed systems: Check what your scanners can read before you choose
For a detailed look at 2D codes, read our guides on how to create permanent QR codes with a fiber laser marker and how to improve QR code readability on small metal components.
Step 1: Know Your Scanner and Your Requirements
The best barcode for your part depends on what will read it. Before you mark anything, find out:
- What type of scanner will be used? A laser line scanner, a camera-based imager, a handheld reader, a fixed camera on a production line, or a phone.
- What codes can it read? Not every scanner reads every type.
- How far away will it scan? Close scanning allows smaller codes.
- What lighting will it use? Industrial readers often have built-in lighting. Phones depend on ambient light.
- Is there an industry standard you must follow? Some industries require specific code types, data formats, and quality levels.
- What data must the code hold? This decides the code size.
If you do not know the answers, test your real scanner on sample marks before production.
Step 2: Keep the Data Short and Simple
The more data in a barcode, the bigger and more complex it gets.
- Use short IDs or serial numbers instead of long text or web addresses.
- Avoid unnecessary characters.
- If you need more information, link the short ID to a database or web page instead of storing it all in the code.
- Choose a data format that your scanning system understands.
A shorter code has larger bars or modules for the same overall size. Larger elements are easier to mark cleanly and easier to scan.
Step 3: Choose the Right Size
Size is one of the most common causes of failed scans.
For 1D Barcodes
- Bar width (the X-dimension) is the width of the thinnest bar. If it is too small, the laser may not mark it cleanly, or the scanner may not resolve it.
- Bar height should be tall enough for the scanner to read across the code. Short bars make scanning difficult.
- Total length must fit on the part, along with quiet zones on each end.
For 2D Barcodes
- Module size is the width of each small square. If modules are too small, they blur together.
- Total code size depends on the data and the error correction level.
How to Find the Right Size
The most reliable way is to test.
- Mark the same code at several sizes on scrap metal of the same type.
- Scan each one with your real scanner.
- Choose the smallest size that scans quickly and reliably every time.
- Add a safety margin, since real-world conditions are never perfect.
A shorter focal length lens, such as an F-163 or F-210, creates a smaller laser spot and allows finer bars and modules. Our guide on how to choose the right fiber laser marking lens explains how lens choice affects detail.
Step 4: Protect the Quiet Zone
Every barcode needs empty space around it, called the quiet zone. It helps the scanner find where the code starts and ends.
- Leave a clear, unmarked border on all sides. For 1D codes, the left and right margins are especially important. For 2D codes, a border on every side is needed.
- Keep text, logos, edges, holes, and scratches out of this area.
- Do not place the code too close to the edge of the part, where reflections and chamfers can cause problems.
Many failed codes are simply too close to something else. Plan the layout so the code has room.
Step 5: Get the Contrast Right
Scanners read the difference in brightness between marked and unmarked areas. On metal, creating good contrast takes some thought.
Common Marking Methods
- Annealing (black marking) on stainless steel. The laser heats the surface to create a dark oxide, giving smooth, high-contrast marks that are popular on tools and medical parts. Our guide on black marking vs. surface engraving on stainless steel explains this.
- Engraving. The laser removes a small amount of material. Contrast depends partly on light and shadow, so results depend on lighting.
- Ablation of coatings. On anodized or painted metal, the laser removes the coating to reveal the metal underneath, giving strong contrast.
- Etching. A shallow mark with smooth, fine detail.
For a clear explanation of how these differ, read the difference between engraving, etching, and printing.
Tips for Better Contrast
- Test on the exact metal and finish you will use.
- Choose positive or negative marking. Sometimes marking the background and leaving the bars unmarked gives better results, depending on the metal and lighting.
- Avoid mirror-polished surfaces where possible, since glare can wash out contrast.
- Make marked areas solid and even, not patchy or striped.
- Think about how the code will be lit when it is scanned.
Step 6: Control Heat Spread (Bar Width Gain)
This is a classic problem with laser-marked barcodes. Heat spreads slightly beyond the laser spot, so marked areas end up a bit wider than designed. Bars grow thicker, gaps shrink, and the code may no longer decode correctly.
This effect is sometimes called bar width gain or dot gain, and it is more noticeable on small codes.
How to Reduce It
- Use lower power and faster speed to limit heat.
- Use a smaller laser spot with a shorter focal length lens and accurate focus.
- Avoid too many passes.
- Use tight but not excessive hatch spacing, so you do not stack extra heat.
- Compensate in software. Some marking programs include a bar width or module adjustment, letting you make bars slightly thinner in the design, so they come out at the right width after heat spread. Check your software for this option.
- Test and measure. Compare the marked code to the design under magnification, and adjust.
Step 7: Choose Good Fill Settings
Bars and modules are usually filled with fine lines (hatching). Fill quality has a big effect on scanning.
- Use tight, even hatch spacing so bars and modules are solid, not striped.
- Avoid over-tight spacing, which adds heat and widens the mark.
- Test the hatch angle. On some machines, fill direction can slightly change the sharpness of bar edges.
- Consider an outline pass for crisper edges.
- Check the fill under magnification for gaps and uneven areas.
Our guide on laser hatch spacing and how it affects mark quality explains how to choose a good value.
Step 8: Set Up the Laser Correctly
Good marking settings protect the code’s accuracy. Exact values depend on your machine and material, so testing is always needed.
- Power: Use only as much as needed for a clear, consistent mark.
- Speed: Moderate to fast speeds limit heat spread.
- Frequency: Test to find the cleanest mark on your metal.
- Focus: Set the surface at the lens’s focal distance. Poor focus is a major cause of blurry codes.
- Passes: Use as few as you can.
Our guide on how to choose the right marking speed and power for fiber lasers explains how these settings work together.
Step 9: Prepare and Hold the Part
A clean, steady part gives a clean, accurate code.
- Clean the surface with soap, water, and alcohol, and dry it completely. Oil and fingerprints cause uneven marks.
- Choose the flattest area of the part.
- Hold the part firmly. Any movement blurs bars and modules. A fixture table for fiber laser marking machines keeps small parts steady and in the same position every time.
- Keep the part level so the whole code is in focus.
- For round parts, use a rotary axis, and see our guide on how to mark logos on rings and other small curved objects for tips on curved surfaces.
If your parts are strongly curved or have different heights, you may also want to read our guide on the difference between 2D and 3D laser marking.
Step 10: Orient 1D Barcodes Correctly
For 1D barcodes, direction matters.
- The scanner reads across the bars, so the scanning path should cross all the bars.
- On curved parts, it is usually better to run the bars along the curve rather than around it, depending on the scanner. Test both on your actual part.
- Do not let the code wrap around so far that part of it falls out of focus or view.
- Keep the code on a flat or gently curved area where possible.
Step 11: Prepare a Clean Vector File
A messy design file can cause a messy code. Always use clean, accurate artwork.
- Use your marking software’s built-in barcode tool, or a reliable generator that exports vector files.
- Do not use a blurry picture of a barcode.
- Keep the size exact, in millimeters.
- Do not stretch or squash the code, which changes bar widths and module proportions.
- Check that the code is not mirrored, especially when using a rotary axis.
Our guide on how to create and import vector files for laser marking explains how to prepare clean files.
Step 12: Test, Scan, and Verify
Testing is where good codes become reliable codes.
- Mark test codes on scrap of the same metal and finish.
- Scan them with the actual scanners that will be used in real life.
- Try different angles, distances, and lighting.
- Look at the marks under magnification to check bar edges, fills, and uneven areas.
- Change one setting at a time and test again.
- Save the best settings with notes on the material, lens, and code size.
- Consider using a barcode verifier if you need to meet industry standards. Verifiers grade code quality against recognized standards, such as ISO/IEC 15416 for linear barcodes and ISO/IEC TR 29158 for direct part marking.
A code that scans easily on the first try is much more likely to keep working in the real world.
Step 13: Plan for What Happens After Marking
Many codes work perfectly when marked and fail later.
- Polishing can wear down shallow marks.
- Plating or coating can fill in small bars and modules or change contrast.
- Heat treatment or passivation can change how a mark looks.
- Cleaning chemicals and abrasion can fade some marks.
- Rough handling can scratch the code and damage the quiet zone.
If your part goes through more processing, test the code after those steps. Sometimes the answer is to change the order of work or choose a deeper or different marking method.
Special Cases
Barcodes on Jewelry and Tags
Small tags and pendants often carry codes for tracking and authenticity. Use a flat area, keep the code simple, and test on the same metal. Our guide on how to prepare jewelry for fiber laser marking covers cleaning and fixturing, and our guide on laser marking gold-plated objects explains how to avoid burning through thin plating.
Barcodes on Stainless Steel Tools and Medical Parts
Smooth, dark annealed codes are often preferred, because they keep the surface smooth and offer good contrast. Follow any industry requirements for your product.
Barcodes on Anodized Aluminum
Removing the anodized layer can give very high contrast, but settings must be tuned carefully so you do not cut too deep.
Very Small Codes
For tiny codes, use short data, a 2D code, a short focal length lens, careful focus, and gentle settings. See our guide on how to mark tiny text without losing readability for related tips.
Troubleshooting Common Problems
The Code Will Not Scan at All
- Check the quiet zone
- Make sure the code is not mirrored or distorted
- Increase the size or shorten the data
- Check contrast and focus
- Confirm the scanner supports that code type
The Code Scans Slowly or Only Sometimes
- Increase bar or module size
- Improve contrast
- Reduce glare with softer lighting
- Check for uneven or patchy marks
- Reduce heat spread
Bars or Modules Look Too Thick or Merged
- Reduce power or increase speed
- Use bar width compensation in software
- Check the focus
- Use a smaller laser spot
Bars or Modules Look Too Thin or Broken
- Increase power or slow down slightly
- Check hatch spacing
- Check that the surface is clean and level
- Make sure the file was not shrunk or stretched
The Code Scans on a Screen but Not on the Part
- Check size and contrast
- Test on the actual metal and finish
- Check lighting and glare
The Code Scans Well at First, Then Fades
- Check what happens after marking, such as polishing or plating
- Increase mark depth or choose a different method
- Protect the code area
Part of the Code Is Blurry
- Check that the part is level
- Check focus across the whole code
- Hold the part more firmly
Laser Safety
Fiber lasers can seriously injure your eyes, even from reflections off shiny metal.
- Wear laser safety glasses rated for 1064 nm.
- Use fume extraction when marking metals and coatings.
- Keep reflective items away from the beam path.
- Keep the machine away from children and untrained users.
- Follow your machine manufacturer’s safety instructions.
Common Mistakes to Avoid
- Choosing a code type your scanner cannot read
- Using very small bars or modules
- Forgetting the quiet zone
- Ignoring heat spread and bar width gain
- Marking on glossy, curved areas without testing
- Using blurry or stretched artwork
- Using too much power
- Skipping the scan test with the real scanner
- Testing only on a screen, not on the actual part
- Ignoring polishing or plating that comes later
- Not saving working settings
Quick Checklist for Scannable Barcodes on Metal
Design
- Right code type for your scanner and use
- Short, simple data
- Suitable size, tested on scrap
- Quiet zone included
- Clean vector file, not mirrored
Setup
- Part clean and dry
- Flat area chosen, or rotary axis for round parts
- Part held firmly and level
- Focus set exactly
- Short focal length lens for small codes
Marking and testing
- Gentle settings with tight, even fill
- Bar width compensation if needed
- Test marks scanned with real scanners
- Verified if standards apply
- Tested again after polishing, plating, or coating
- Settings saved
FAQ
Can a fiber laser mark barcodes on metal?
Yes. Fiber lasers are widely used to mark 1D and 2D barcodes directly on steel, aluminum, brass, and many other metals.
Which is better on metal: 1D or 2D barcodes?
2D codes, especially Data Matrix, are usually better for small metal parts, because they are compact and have error correction. 1D codes are fine when your scanning system needs them and you have enough space.
Why will my laser-marked barcode not scan?
Common causes include low contrast, bars or modules that are too small, heat spread, missing quiet zone, poor focus, glare, and the wrong code type for the scanner.
What is bar width gain?
It is the tendency for laser-marked bars to come out wider than designed because of heat spread. You can reduce it with lower power, a smaller spot, and bar width compensation in your software.
What is a quiet zone?
It is the empty space around a barcode that helps scanners find its edges. Keep it clear of marks, edges, and scratches.
How do I improve contrast on metal?
Choose a marking method suited to the metal, such as annealing on stainless steel or removing coatings on anodized aluminum, test settings, and avoid very glossy finishes where possible.
Do I need a barcode verifier?
Only if your industry or customer requires a certain quality grade. For many uses, scan testing with real scanners is enough.
Can I mark barcodes on curved metal?
Yes, but it is harder. Use the flattest area, keep the code small, and use a rotary axis for round parts. Always test scanning.
Will polishing or plating affect my barcode?
It can. Polishing may wear it down, and plating can fill in small bars and modules. Test the code after these steps.
Can phones scan laser-marked barcodes?
Phones read QR codes well, but may struggle with some 1D and Data Matrix codes. Test with the phones your customers use.
Conclusion
Marking barcodes on metal without losing scanning accuracy comes down to a handful of simple habits.
Choose the right code type for your scanner, keep the data short, and make the bars or modules large enough. Protect the quiet zone, get strong contrast, and control heat so bars do not grow wider than designed. Use a clean vector file, hold the part firmly, set the focus carefully, and use gentle, well-tested laser settings. Then scan your test marks with the real scanners, check them again after any later processing, and save the settings that work. Do this every time and your barcodes will scan quickly and reliably for as long as the part lasts.
If you are setting up or upgrading your marking workshop, explore our fiber laser marking machines, field lenses, rotary axes, and fixture tables at MCast 3D. If you are not sure which setup suits your barcode marking needs, contact our team and we will help you choose.