
What Is a Dental Gingiva Mask and How Is It 3D Printed?

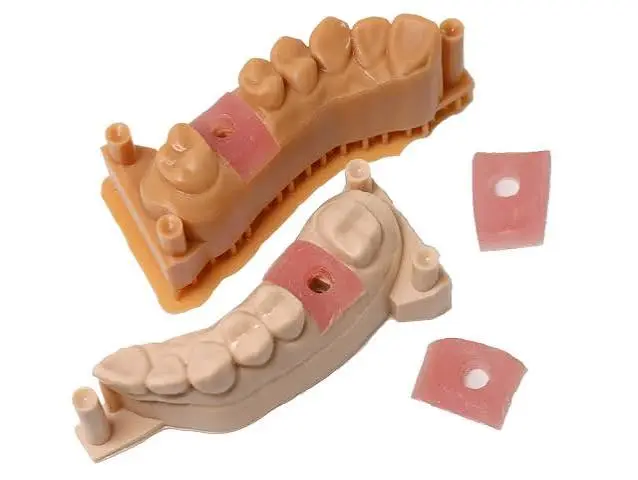
If you work in a dental lab or follow digital dentistry, you may have come across the term gingiva mask. It sounds technical, but the idea is simple, and it plays a surprisingly important role in making implant crowns, bridges, and other restorations that fit and look natural.
With digital workflows becoming standard, a growing number of labs are asking the same question: can we 3D print a gingiva mask instead of making it by hand from silicone?
The answer is yes, and it is changing how many labs work. In this guide, you will learn what a dental gingiva mask is, why it is used, and how it is 3D printed, including materials, design, printing, finishing, and common problems, all in plain and simple language.
This article is general information for dental labs and clinics. It is not clinical advice. Always follow your printer, resin, and software manufacturers’ instructions, and the standards that apply to your practice.
What Is a Gingiva Mask?
The gingiva is the gum tissue around the teeth. A gingiva mask is a soft, removable replica of that gum tissue, made to fit around the teeth, implants, or preparations on a dental model.
You can think of it as a flexible “gum collar” that sits on the model.
- It is usually made from a soft, elastic material, so it can be removed and put back easily.
- It copies the shape of the patient’s gum around the implant or prepared tooth.
- It is usually colored pink or translucent, to resemble real gum tissue.
The model itself is rigid, but the gingiva mask is soft. This lets the technician see and work with the area under the gum, and then replace the mask to check how the restoration meets the tissue.
Why Do Dental Labs Use a Gingiva Mask?
A hard model alone does not show how a restoration will interact with soft tissue. A gingiva mask solves this problem. It helps the technician to:
- See the margins of a crown or abutment clearly, by removing the mask
- Check the emergence profile, which is how a crown or implant restoration comes out of the gum
- Shape the contour of the restoration so it meets the gum naturally
- Check the fit of the restoration against the gum, by putting the mask back
- Avoid pressure on the soft tissue, which might cause problems in the mouth
- Improve aesthetics, because the transition from gum to crown is a key part of how a restoration looks
Gingiva masks are especially important in implant dentistry, where the soft tissue shape around an implant strongly affects the final result.
Where Are Gingiva Masks Used?
- Implant crowns and bridges. The most common use. The mask surrounds the implant analog on the model.
- Crown and bridge on natural teeth, where margins sit near or below the gum line
- Full-arch implant restorations
- Veneers and aesthetic cases where gum contour matters
- Orthodontic and surgical models in some cases
- Teaching and demonstration models
The Traditional Way to Make a Gingiva Mask?
Before 3D printing, gingiva masks were made by hand.
- The lab prepared the stone model with a recess or a gum area.
- A technician applied a silicone gingiva mask material, which is a soft, rubber-like silicone, around the implant analog or prepared teeth.
- The silicone was shaped by hand or with a form, then allowed to set.
- The mask was trimmed and fitted to the model.
This process works, but it has some downsides.
- It is manual and time-consuming.
- Results depend on the technician’s skill.
- Every mask is slightly different, which makes consistency hard.
- Remakes need the whole process to be repeated.
- Bubbles and uneven thickness can occur.
- The silicone may tear, shrink, or lose shape over time.
These limitations are a major reason why digital workflows are so attractive.
The Digital Way: 3D Printed Gingiva Masks
In a digital workflow, the gingiva mask is designed on a computer and printed with a flexible resin. Often, the model is printed in a rigid resin and the mask in a soft resin, and the two are assembled afterward.
Why 3D Print a Gingiva Mask?
- Consistency. The same file produces the same mask each time.
- Speed. Design and printing can run with little hands-on time.
- Precision. The mask is designed to fit the model exactly.
- Easy remakes. If a mask tears or is lost, you can reprint it from the file.
- Better control over thickness, shape, and retention features
- Fits a fully digital workflow, from intraoral scan to finished restoration
Step-by-Step: How Gingiva Masks Is 3D Printed
Here is the typical workflow from start to finish.
Step 1: Capture the Data
The process begins with a digital scan of the patient’s mouth, taken with an intraoral scanner, or a scan of an impression or a stone model with a lab scanner.
For implant cases, the scan includes a scan body, a small part attached to the implant that shows the scanner exactly where the implant is and how it is oriented.
The quality of this scan matters a great deal. Any error will carry through to the model and the mask. Our guide on what causes poor fit in 3D printed dental models explains where scan errors come from and how to reduce them.
Step 2: Design the Model
Dental CAD software turns the scan into a digital working model.
- Implant positions are marked, and analog sockets or holes are added to hold implant analogs.
- The model is hollowed or shaped as needed.
- A recess or channel is designed where the gingiva mask will sit.
- Retention features may be added, so the mask stays in place.
Step 3: Design the Gingiva Mask
The software creates a mask that fits the recess and matches the gum contour.
Important design choices include:
- Thickness. Too thin and it can tear. Too thick and it may not seat well.
- Fit and tolerance. The mask must fit snugly, but be removable without force.
- Margin and edge shape. The edges should blend with the model.
- Retention features. Small undercuts or ridges that hold the mask in place.
- Openings around implant analogs or preparations.
- Undercuts. Soft materials can handle some undercut, but too much makes removal hard.
The design is usually saved as an STL file.
Step 4: Choose the Right Materials
The model and the mask usually use two different resins.
- Model: a rigid, accurate dental model resin
- Gingiva mask: a soft, flexible gingiva resin, often pink or translucent
Flexible gingiva resins are made to be soft, elastic, and tear-resistant. They are measured by hardness, usually on the Shore A scale. A lower number means softer and more rubber-like.
Always use resins made for dental models, and follow the manufacturer’s instructions. If you are not familiar with how flexible resins differ from rigid ones, our guide on the difference between engineering resin and standard resin explains the main types.
Important: Do not mix different resins or brands to try to create your own gingiva material. Our guide on whether you can mix different brands of 3D printer resin explains why this is risky.
Step 5: Prepare the Print
In your slicing software:
- Orient the mask to reduce supports and distortion. Many users print masks flat or at a slight angle, but follow your resin manufacturer’s recommendations.
- Add supports in places that will not affect the fit surfaces. Soft resins are flexible, so supports should hold the mask firmly without pulling it out of shape.
- Choose a layer height suited to the detail you need. Fine layers help with smooth surfaces and accurate edges.
- Use the resin’s recommended exposure settings. Soft resins often need different exposure from rigid ones.
- Print the model and the mask separately, or on the same plate if the resins allow it. Usually they are printed in different resins, so separate jobs are required.
Step 6: Print the Mask
Printing soft resin can be trickier than printing rigid resin.
- Soft prints are more likely to flex and detach, so strong supports and good bottom layers matter.
- Slow lift speeds reduce the peel force on soft parts.
- A healthy printer helps. Keep the build plate level and the film in good condition. See our guide on how to calibrate your resin 3D printer’s Z-axis and level the build plate, and our guides on NFEP film and when to replace an LCD screen.
- Keep the resin mixed and warm. Soft resins are often thicker.
If prints are failing, our guide on why resin 3D prints fail can help you find the cause.
Step 7: Wash the Mask
Washing soft resin needs extra care.
- Use the cleaning liquid and time recommended by the manufacturer.
- Do not soak too long. Flexible resins can swell, soften, or change shape if left in solvent.
- Use clean liquid for the final rinse.
- Gently agitate. Avoid harsh scrubbing, which can tear soft parts.
- Dry thoroughly before curing.
Our guide on the difference between water-washable resin and standard resin explains the two common washing methods.
Step 8: Cure the Mask
Follow the resin manufacturer’s cure time and method.
- Under-curing leaves the mask sticky, weak, or too soft.
- Over-curing can make it stiff, brittle, and prone to tearing.
- Make sure all sides get even light, and avoid excess heat.
Because soft resins are sensitive to curing, accurate steps matter. Our guide on why resin changes color after UV exposure also explains how curing affects resin over time.
Step 9: Remove Supports and Finish
- Cut supports gently, with small flush cutters, rather than pulling.
- Clean small stubs with a sharp blade or fine tools, taking care not to tear the soft material.
- Check edges for roughness that could interfere with fit.
- Do not sand soft materials aggressively. Light, careful trimming is better.
Step 10: Fit the Mask to the Model
Place the mask onto the printed model and check:
- Does it seat fully without forcing?
- Is the fit snug, but removable with moderate effort?
- Are the edges flush with the model?
- Do the openings line up with implant analogs and preparations?
- Does it stay in place when you work on the model?
If the fit is wrong, check the design, printer calibration, and post-processing steps, then reprint if needed.
Step 11: Use It in the Worflow
The finished mask is now used just like a traditional one. The technician removes it to work on margins and contours, and replaces it to check the emergence profile and the fit of the restoration against the soft tissue.
Materials: What to Look for in a Gingiva Resin
When choosing a resin for gingiva masks, check the data sheet and the manufacturer’s recommendations.
- Shore hardness. Soft enough to flex and remove, but firm enough to hold shape.
- Tear strength and elongation. The mask must stretch and return without tearing.
- Color and translucency. Pink or translucent resin looks like gum tissue and helps you see the model beneath.
- Dimensional accuracy. Low shrinkage and good stability matter for fit.
- Printer compatibility. Make sure the resin is made for your type of printer.
- Post-processing instructions. Washing and curing steps must be followed exactly.
- Dental suitability. Choose resins designed for dental models and appliances.
Because soft resins can age, harden, or discolor over time, store finished masks properly, away from heat and strong light.
Design Tips for Better Gingiva Masks
Good design makes printing easier and the mask more reliable.
- Keep thickness consistent, with no very thin spots that can tear.
- Use smooth transitions instead of sharp steps.
- Add gentle retention features, but avoid deep undercuts that make removal hard.
- Leave a small, tested tolerance between the mask and the model, so it seats easily. Test your own tolerance on sample prints.
- Round sharp corners to reduce tear risk.
- Keep edges clean and thin where they meet the model, so there is no step.
- Consider printing a spare mask, especially for complex cases.
Common Problems and How to Fix Them
The Mask Does Not Fit the Model
- Check the printer’s calibration with a reference model
- Check the design tolerance
- Review washing and curing times
- Check for warping or shrinkage
- Check that the model and mask were designed from the same scan data
Our guide on dental model accuracy: 3D printing vs. traditional impressions explains how accuracy is measured and improved.
The Mask Tears Easily
- Check resin choice, and use a tear-resistant gingiva resin
- Make the design thicker where needed
- Avoid over-curing
- Remove supports more gently
The Mask Is Too Soft or Too Stiff
- Check that you are using the intended resin
- Review curing time and temperature
- Choose a resin with a different Shore hardness
The Mask Is Sticky
- Wash again with clean liquid
- Cure for the recommended time
- Check exposure settings
- Make sure the resin is mixed and warm
The Mask Warps or Changes Shape
- Support the mask properly while curing
- Avoid heat and too much UV
- Store flat, away from heat and sunlight
- Check the design thickness
The Print Fails Midway
- Check build plate leveling and film condition
- Use stronger supports
- Slow the lift speed
- Check resin temperature and mixing
Bubbles Appear in the Mask
- Let the resin rest after mixing
- Avoid shaking the resin right before printing
- Remove surface bubbles before starting
The Mask Changes Color Over Time
- Store away from sunlight and heat
- Do not over-cure
- Check the resin’s stability on the data sheet
Gingiva Masks and Digital Workflow Choices
Gingiva masks fit best into a complete digital workflow.
- Intraoral scanning captures the mouth without traditional impressions. Our guide on dental model accuracy compares digital and traditional methods.
- CAD software designs the model and the mask.
- A reliable resin printer produces both parts. Choose a printer with good resolution and build quality. Our guides on how to compare resin 3D printers by build volume and XY resolution and 8K vs 16K resin 3D printers can help.
- Consistent post-processing keeps results repeatable.
Some printers and software systems also support multi-material printing, where model and soft tissue are printed together. This is more advanced and depends on your equipment, so check with your supplier.
Safety Reminder
Resin printing needs safe handling, especially in a clinic or lab.
- Wear nitrile gloves and eye protection.
- Work in a well-ventilated space.
- Store resin properly and dispose of waste correctly.
- Follow infection control rules for impressions, models, and equipment.
Our guide on resin 3D printing safety covers ventilation, gloves, storage, and waste disposal in detail.
Common Mistakes to Avoid
- Using a rigid resin for a mask that needs to be soft
- Using a non-dental resin for dental models
- Mixing different resins or brands
- Over-washing and over-curing soft resins
- Pulling supports off instead of cutting them
- Designing masks with very thin, tear-prone areas
- Skipping printer calibration and test fits
- Ignoring scan quality, especially around implants
- Storing masks in heat or sunlight
- Not documenting settings and results
Quick Checklist for 3D Printed Gingiva Masks
Design
- Good scan, with scan bodies for implant cases
- Model with correct analog sockets and recess
- Mask with consistent thickness, smooth edges, and tested tolerance
- Gentle retention features
Printing
- Dental model resin for the model, gingiva resin for the mask
- Printer calibrated, plate leveled, film in good shape
- Strong supports and slow lift speed
- Resin mixed and warm
Post-processing
- Washed with recommended liquid and time
- Dried completely
- Cured as instructed, not over-cured
- Supports cut gently
Checking
- Mask seats fully and snugly
- Edges flush, openings aligned
- Fit tested and documented
- Stored away from heat and sunlight
FAQ
What is a gingiva mask in dentistry?
It is a soft, removable replica of gum tissue that fits around teeth or implants on a dental model. It helps technicians see margins and check how a restoration meets the gum.
Why is gingiva mask used on implant models?
It lets the technician work on the implant area, then replace the soft tissue to check the emergence profile and fit. This is key for natural-looking, well-fitting implant restorations.
Can a gingiva mask be 3D Printed?
Yes. It can be designed in dental CAD software and printed with a flexible gingiva resin, then fitted to a rigid printed model.
What resin is used to print gingiva masks?
A soft, flexible dental resin, usually pink or translucent, designed for gingiva masks. Always use the resin recommended by the manufacturer and follow its instructions.
Is a printed gingiva mask as good as a silicone one?
It can be, if the design, resin, and post-processing are right. Printed masks are more consistent and easier to remake, while silicone masks are traditional and familiar.
Do I need a special printer?
Not necessarily. Many resin printers can print flexible dental resins, but check compatibility, resolution, and the manufacturer’s recommendations.
Can I print the model and the mask at the same time?
Only if your printer and materials support multi-material printing. Otherwise, you print the rigid model and the soft mask separately, then assemble them.
Why does my printed mask not fit?
Common causes include scan errors, design tolerance, printer calibration, shrinkage, and washing or curing mistakes. Check each step, and print a reference model.
How do I stop my gingiva mask from tearing?
Use a tear-resistant resin, design adequate thickness, avoid over-curing, and cut supports gently rather than pulling.
How long does a printed gingiva mask last?
It depends on the resin, use, and storage. Store masks away from heat and sunlight, and reprint from the file if they become damaged, stiff, or discolored.
Conclusion
A dental gingiva mask is a soft replica of the gum that sits on a model, letting technicians see margins, check emergence profiles, and make restorations that fit and look natural. Traditionally made by hand from silicone, it can now be designed digitally and 3D printed with flexible dental resins.
The key steps are a clean scan, a well-designed model and mask, a suitable pair of resins, a calibrated printer, and careful washing, curing, and finishing. With consistent steps and good records, printed gingiva masks can be accurate, repeatable, and easy to remake, which makes them a valuable part of any digital dental workflow.
If you are setting up or improving a digital dental lab, explore our range of resin 3D printers, dental resins, and accessories at MCast 3D. If you are not sure which printer or resin suits your lab, contact our team and we will help you choose a setup that fits your needs.