
What Is the Difference Between 2D and 3D Laser Marking?

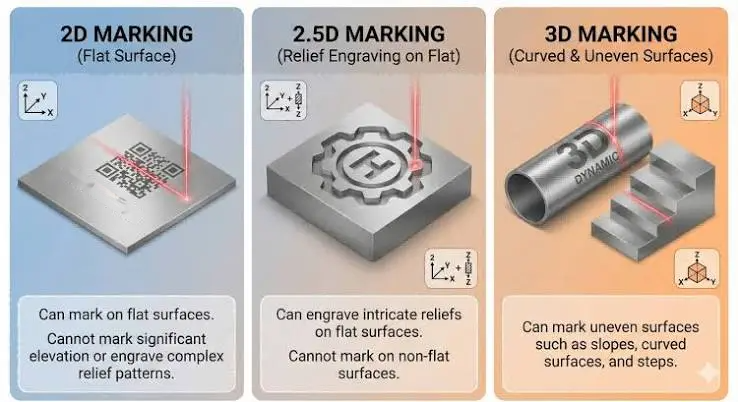
If you are shopping for a fiber laser marking machine, you will probably see the words “2D” and “3D” used in product descriptions, forum posts, and sales pages. Some people say they need a 3D laser for curved parts. Others say a normal machine does everything they need.
So what is the real difference between 2D and 3D laser marking? Do you need the more advanced option, or is it just extra cost?
In this guide, you will learn the difference between 2D and 3D laser marking, how each one works, what each is best for, and how to decide which one fits your work. We will also clear up a common confusion, because the term “3D laser marking” is used in more than one way. Everything is explained in simple language.
The Short Answer
- 2D laser marking marks on a flat surface. The laser moves left, right, forward, and back (X and Y), and the focus stays at one fixed height.
- 3D laser marking marks on curved, stepped, or uneven surfaces. In addition to X and Y, the machine can also move the focus up and down (Z) while it marks, so the laser stays sharp even when the surface height changes.
In simple terms, 2D is for flat things, and 3D is for shaped things.
How 2D Laser Marking Works
Most fiber laser marking machines in workshops are 2D systems. Here is how they work.
- A laser source produces a beam of light.
- The beam passes through a galvo scanner, a pair of tiny, fast mirrors that move the beam in X and Y directions.
- A field lens (also called an F-theta lens) focuses the beam to a small spot on your material.
- The mirrors move the spot across the surface to draw text, logos, codes, and patterns.
The key point is that the focus distance stays fixed. The laser is sharp at one height, and the surface needs to be at that height.
If you want to understand lenses better, read our guide on how to choose the right fiber laser marking lens.
What 2D Marking Is Great At
- Flat plates, tags, and name plates
- Flat faces of tools, parts, and jewelry
- QR codes, serial numbers, and logos on flat areas
- Gently curved surfaces, within the lens’s focus range
- High-speed marking in production lines
Where 2D Marking Struggles
- Strongly curved surfaces, such as the side of a ball
- Stepped or uneven parts, with large height differences
- Deep recesses or raised features
- Large parts with different heights across the surface
On these surfaces, part of the mark will be out of focus. The result can be blurry, faint, or uneven.
What Is Depth of Field, and Why Does It Matter?
Every lens has a small range where the laser stays sharp. This is called depth of field, and it is measured in millimeters above and below the perfect focus point.
- Short focal length lenses create a very small spot but have a small depth of field. They are less forgiving about height changes.
- Longer focal length lenses have a larger depth of field, but the spot is bigger.
If the surface stays inside this range, a 2D marker works well. If the height changes more than the lens allows, you need another solution. That is where 3D marking, rotary axes, and other tools come in.
How 3D Laser Marking Works
A 3D laser marking system adds one more motion: it can move the focus point up and down while the laser is marking.
There are two common ways this is done.
- Dynamic focus module. A small moving lens or optical element in the beam path changes where the beam comes to focus. The scanner then has X, Y, and Z control.
- Z-axis movement. In some setups, the whole marking head or a motorized stage moves up and down, though this is slower.
With 3D control, the laser can follow the shape of the surface. As it moves from a high point to a low point, the focus follows, so the mark stays sharp.
What You Need for 3D Marking
- A 3D-capable marking system with a dynamic focus module
- 3D-capable software that understands depth
- A 3D model of the part, such as a CAD file, so the software knows its shape
- Accurate positioning of the part so it matches the model
- Calibration to make sure the focus and the surface line up
This is more complex than 2D marking, which is why 3D systems cost more and need more setup time.
What 3D Marking Is Great At
- Curved surfaces, such as bottles, domes, and spherical parts
- Stepped and uneven parts, with multiple height levels
- Molded plastic and cast parts with contoured surfaces
- Medical devices and instruments with complex shapes
- Automotive and aerospace parts with curves and recesses
- Large parts where flat marking would drift out of focus
- Consumer products with sculpted surfaces
Where 3D Marking Is Less Practical
- Simple flat work, where it adds cost without benefit
- Very high-volume simple jobs, where speed and simplicity matter most
- Small workshops on a tight budget
- Jobs without a 3D model of the part
The Second Meaning of “3D Laser Marking” (3D Engraving)
This is where the confusion starts. The term 3D laser marking is often used to mean something else: 3D laser engraving, also called relief engraving.
In 3D engraving, the laser does not just mark the surface. It removes material layer by layer to create a shape with actual depth, like a small sculpture or relief. Think of a logo with raised and sunken parts, a coin-like design, or a textured mold surface.
How 3D Engraving Works
- The design is created as a depth map or 3D model, showing how deep each area should be.
- The software slices the design into many thin layers.
- The laser removes material one layer at a time, going deeper in some areas than others.
- After many passes, a shape with real depth appears.
What 3D Engraving Is Used For
- Molds and dies
- Decorative reliefs and textures
- Embossing tools
- Artistic work and detailed designs
- Some industrial textured surfaces
Important Differences from 3D Marking on Curved Surfaces
- 3D engraving creates depth in the material.
- 3D marking on curved surfaces follows depth that already exists.
- 3D engraving usually takes much longer because of the many passes.
- Machines for 3D engraving often need higher power and a way to control depth precisely.
So when someone says “3D laser,” always ask which meaning they have in mind. They might mean marking on a 3D surface, or engraving a 3D shape. Some machines can do both, but they are different jobs.
Side-by-Side Comparison
| Feature | 2D Laser Marking | 3D Laser Marking (on curved surfaces) | 3D Laser Engraving (relief) |
|---|---|---|---|
| Surface | Flat or nearly flat | Curved, stepped, or uneven | Any, where depth is created |
| Focus | Fixed height | Moves up and down during marking | Changes as layers are removed |
| Main goal | Mark a flat surface | Keep focus on a shaped surface | Create a shape with real depth |
| Needs 3D model? | No | Usually yes | Yes, or a depth map |
| Speed | Fast | Moderate | Slow |
| Cost | Lower | Higher | Higher |
| Complexity | Simple | More complex | Most complex |
| Typical users | Jewelry, tools, tags, general workshops | Automotive, medical, consumer products | Mold makers, artists, industrial texturing |
These are general differences, and every machine and maker is a little different.
Do You Need 3D, or Is There a Cheaper Option?
For many jobs, you do not need a full 3D system. There are simpler tools that solve common curved-surface problems.
Use a Rotary Axis for Cylinders
A rotary axis turns a round object, such as a ring, tube, or pen, while the laser marks. This keeps the surface at the right distance from the lens, and it lets you mark around the whole circumference. It is much cheaper than a 3D system and works very well for round parts. We offer a rotary axis for fiber laser marking machines and a rotary worktable for this kind of work. Our guide on how to mark logos on rings and other small curved objects explains how to use them.
Use a Longer Focal Length Lens
Longer lenses have a larger depth of field, so they handle more height variation. The trade-off is a larger spot size. See our fiber laser marking machine field lens options.
Keep the Mark Small
A small logo on a gentle curve stays within the focus range. If the mark only covers a small area, 2D marking can work well even on a slight curve.
Use Fixtures and Tilting
A good fixture can hold a part at an angle so that the marking area is flat to the laser. A fixture table for fiber laser marking machines keeps parts steady and repeatable.
Mark Multiple Heights Separately
For stepped parts, you can adjust the height and mark each level separately. This takes more time, but it avoids buying a 3D system.
Use Autofocus or Height Sensors
Some machines have sensors that measure the surface height and adjust the focus before marking. This helps with parts that vary slightly from piece to piece, though it does not follow a curve within a single mark.
When Is 3D Marking Worth It?
A 3D laser system makes sense when:
- You regularly mark strongly curved or contoured parts that a rotary axis cannot handle, such as domes or free-form shapes
- Your parts have multiple heights within one mark area
- You need very accurate marks on complex surfaces, such as medical devices
- You mark in a production environment where consistent results across thousands of parts matter
- You can supply 3D models of your parts
- The cost of failed marks is high
It is less likely to be worth it when:
- Most of your work is flat
- You mostly mark round items that a rotary axis can handle
- You are just starting out and want a flexible, affordable setup
- You do not have 3D data for your parts
Jewelry and Small Workshops: Which One Do You Need?
For most jewelry and small-workshop work, a 2D fiber laser with the right accessories is more than enough.
- Flat tags, pendants, and plates: 2D marking works perfectly.
- Rings and bangles: A rotary axis or ring holder handles the curve.
- Tiny text and fine detail: A short focal length lens and careful focus matter more than 3D. See our guide on how to mark tiny text without losing readability.
- Plated pieces: Gentle settings and careful testing matter most. See our guide on laser marking gold-plated objects.
- Color marking on steel: This depends on settings and the laser type, not on 3D. See our guide on how to mark stainless steel in color with a fiber laser.
A 3D system is usually overkill unless you are marking complex sculpted pieces or working in an industrial setting.
How Software and Files Differ
The files you need depend on the type of marking.
- 2D marking uses simple 2D artwork. Our guide on how to create and import vector files for laser marking explains how to prepare it.
- 3D marking on curved surfaces usually needs a 3D model of the part, plus the artwork, so the software can wrap the design onto the surface.
- 3D engraving needs a depth map, a 3D model, or special relief software.
If you do not have 3D data, you may be able to create a simple model, scan the part, or use the manufacturer’s CAD files.
Settings and Quality Considerations
The same basic principles apply to both 2D and 3D marking.
- Power, speed, and frequency control how the mark looks. Our guide on how to choose the right marking speed and power for fiber lasers explains how they work together.
- Hatch spacing affects how smooth and solid fills look. See our guide on laser hatch spacing and how it affects mark quality.
- Focus accuracy is critical in both cases. In 3D marking, it is even more important to calibrate and position the part correctly.
- Material and finish change results. Always test on a sample of the same material.
- QR codes and fine detail need very good focus. Our guides on how to create permanent QR codes with a fiber laser marker and how to improve QR code readability on small metal components explain how to keep codes readable.
Laser Safety
Fiber lasers, 2D or 3D, can seriously injure your eyes, even from reflections.
- Wear laser safety glasses rated for 1064 nm.
- Use fume extraction when marking metals and coatings.
- Keep reflective items out of the beam path.
- Keep the machine away from children and untrained users.
- Follow your machine manufacturer’s safety instructions.
Common Mistakes to Avoid
- Buying a 3D system when a rotary axis would do the job
- Assuming “3D laser” always means the same thing
- Marking a strongly curved surface with a 2D setup and a short lens
- Not checking whether you have 3D models for your parts
- Forgetting that 3D engraving is slow and needs much more processing
- Skipping the test mark on a sample
- Not calibrating the focus, especially on 3D systems
- Ignoring depth of field when choosing a lens
- Not wearing laser safety glasses
Quick Decision Checklist
Choose 2D marking if:
- Your parts are flat or nearly flat
- You mark small logos on gentle curves
- You want a simple, fast, and affordable setup
- You can add a rotary axis for round items
Choose 3D marking on curved surfaces if:
- You regularly mark domes, bottles, or contoured parts
- Parts have multiple heights in one mark area
- You have 3D models and need consistent results in production
Choose 3D engraving if:
- You need to create real depth, relief, or texture
- You work with molds, dies, or detailed sculpted designs
- You accept longer processing times
Always:
- Check what “3D” means in the product description
- Test on a sample of your real part
- Match the lens, fixture, and software to your work
FAQ
What is the main difference between 2D and 3D laser marking?
2D marking works on flat surfaces with a fixed focus, while 3D marking can move the focus up and down to follow curved or uneven surfaces.
Can a 2D laser mark curved surfaces?
Yes, to a limited degree. Gentle curves and small marks can work, especially with a rotary axis or a longer lens. Strongly curved surfaces usually need a different solution.
Do I need a 3D laser to mark rings?
Usually not. A rotary axis or ring holder handles most ring marking well, and it costs much less than a 3D system.
Is 3D laser marking the same as 3D laser engraving?
No. 3D marking follows an existing 3D surface, while 3D engraving removes material layer by layer to create depth. The terms are often mixed up, so check which one is meant.
Is 3D laser marking slower than 2D?
Often, yes. The extra focus movement and processing add time, and 3D engraving is slower still because of the many passes.
Do I need a 3D model 3D marking?
Usually yes, so the software knows the shape of the part. Some systems can scan the part or use height sensors instead.
Is a 3D laser worth the extra cost?
It is worth it if you regularly mark complex curved or stepped parts. For flat parts and simple round items, a 2D machine with a rotary axis is usually enough.
Can the same machine do both 2D and 3D?
Some machines can, if they have a dynamic focus module and the right software. Many standard machines are 2D only.
Does lens choice matter for 2D and 3D?
Yes. The lens affects spot size and depth of field in both cases. Our guide on choosing the right lens explains how.
What is the best way to start with curved parts?
Start with a 2D machine, a good lens, and a rotary axis or fixtures. If you still cannot get the results you need, then consider a 3D system.
Conclusion
The difference between 2D and 3D laser marking comes down to the shape of your parts.
2D marking is fast, simple, and perfect for flat or nearly flat surfaces. 3D marking adds focus movement so the laser stays sharp on curved, stepped, or uneven parts. And 3D engraving is something else again: it carves real depth into the material layer by layer. For most jewelry, tool, and small-workshop jobs, a 2D fiber laser with the right lens, fixtures, and a rotary axis does the job well. A full 3D system is worth considering only when your parts truly need it.
If you are choosing equipment, explore our fiber laser marking machines, lenses, rotary axes, and fixture tables at MCast 3D. If you are not sure which setup suits your parts, contact our team and we will help you choose.