
Why Does Resin Change Color After UV Exposure?

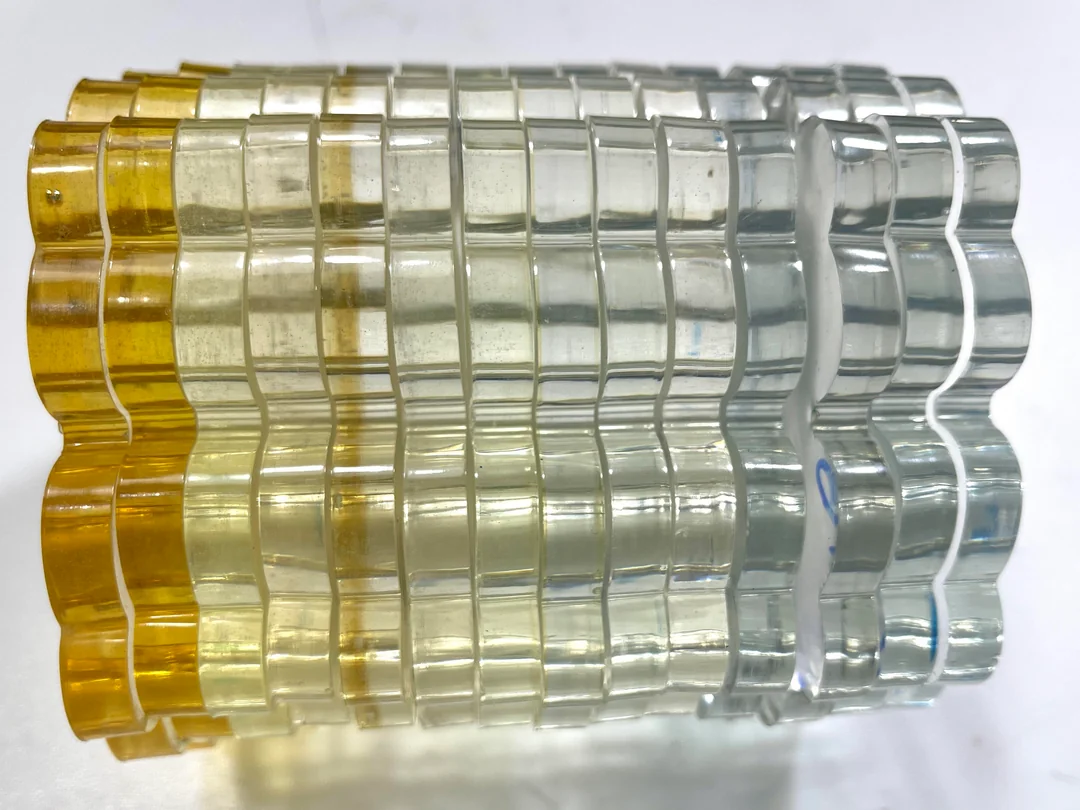
You print a crystal-clear part, cure it, and set it on the shelf. A few weeks later, it has a yellow tint. Or you print a bright white model, and by the time it comes out of the curing station it looks slightly cream. Maybe your light gray figure turned a shade darker, or a bottle of resin looks different from the one you bought last month.
Color change after UV exposure is one of the most common, and most confusing, things resin printer owners notice. It can feel like something went wrong, but in most cases it is simply chemistry at work.
The good news is that once you understand why resin changes color, you can slow it down and often prevent it. In this guide, you will learn why resin changes color after UV exposure, what causes yellowing, how curing, sunlight, heat, and storage affect color, and what you can do about it, in plain and simple language.
The Short Answer
Resin changes color after UV exposure because UV light keeps driving chemical reactions inside the plastic.
- During curing, UV light triggers the resin to harden. The ingredients that start this reaction can affect color.
- After curing, continued UV light, heat, and oxygen can slowly break down parts of the plastic, which often causes yellowing or other color shifts.
- Pigments and dyes can also fade or shift when exposed to UV light.
So color change can come from the curing process itself, or from long-term aging. Both are normal for photopolymer resins, though some resins handle it better than others.
A Quick Look at What Is Inside Resin
To understand color change, it helps to know what resin contains. A typical photopolymer resin includes:
- Monomers and oligomers: the building blocks that link together to form solid plastic
- Photoinitiators: chemicals that react to UV light and start the curing process
- Pigments or dyes: these provide color
- Additives: stabilizers, flow agents, and other ingredients that adjust properties
Each of these parts can play a role in color change, which is why different resins behave differently.
Cause 1: The Photoinitiator
Photoinitiators are the “on switch” for curing. When UV light hits them, they react and start the chain reaction that turns liquid resin into solid plastic.
Many photoinitiators are slightly yellowish by nature. That has two effects.
- In liquid resin, they can give “clear” resin a faint tint.
- During curing, some photoinitiators change as they react. Some tint can fade at first, which is sometimes called photobleaching, and some leftover byproducts can add a yellow tone.
If a resin contains more photoinitiator, or a type that is more prone to color, the cured part may look more yellow. This is one reason why “water-clear” resins can still have a slight tint.
Cause 2: Over-Curing
Curing a part longer than recommended can cause more color change than expected.
- Extra UV exposure keeps the chemical reactions going.
- Extra heat from the curing station can speed up yellowing.
- The surface of the part may become more brittle and slightly darker or yellower.
This is especially noticeable on clear, white, and light-colored resins. If you leave a clear print in a curing chamber for much longer than needed, it may turn yellow right away.
Our guide on whether resin 3D printing can produce transparent parts explains why careful curing matters so much for clarity.
Cause 3: Long-Term UV Aging (Sunlight)
Once a part is cured, it is not completely protected from UV light. Sunlight contains a lot of UV, and over weeks or months it can slowly damage the plastic.
This process is called photo-oxidation or UV degradation:
- UV light hits the plastic and breaks some chemical bonds.
- The broken pieces react with oxygen in the air.
- New chemical groups form that absorb more light, which we see as yellowing.
- The material may also become more brittle.
This is why parts left in a sunny window, on a car dashboard, or outdoors change color faster than parts stored in a drawer.
Cause 4: Heat
Heat speeds up almost every chemical reaction. When a resin part is warm, aging reactions happen faster.
- Curing stations can get warm, especially with long cure times.
- Sunlight adds heat as well as UV.
- Hot environments, like cars, rooftops, and workshops without cooling, accelerate yellowing.
UV and heat together are more damaging than either one alone.
Cause 5: Oxygen and Air Exposure
Oxygen plays two roles.
- During curing, oxygen at the surface can interfere with the reaction, leaving a slightly tacky or incompletely cured outer layer. That surface can age and discolor differently from the inside.
- After curing, oxygen takes part in the photo-oxidation that causes yellowing.
Some users cure parts under water or in a covered dish to reduce oxygen at the surface, which can leave a smoother, less tacky finish. If you try this, follow the instructions from your resin manufacturer.
Cause 6: Pigments and Dyes Fading
Colored resins use pigments or dyes, and these can react to UV light too.
- Some dyes fade over time in sunlight, especially bright reds, blues, and yellows.
- Some pigments are more stable and keep their color better.
- Mixed colors can shift if one pigment fades faster than another.
- Dark colors may look lighter or grayer as the surface weathers.
This is why a brightly colored figure can look washed out after a long time in a sunny spot.
Cause 7: Residual Uncured Resin and Dirty Wash Liquid
If a print is not washed properly, a thin film of uncured resin or dirty cleaning liquid may stay on the surface. When this layer cures, it can create:
- A yellowish or cloudy surface
- Sticky or uneven patches
- A slight color difference compared with a clean part
Our guides on the difference between water-washable resin and standard resin and how to remove cured resin from an FEP film explain how to keep your process clean.
Cause 8: Moisture, Chemicals, and Handling
Other factors can also affect color over time.
- Moisture, especially in water-washable resins, can cause cloudiness or slight color changes.
- Cleaning chemicals, solvents, and oils can stain or discolor surfaces.
- Skin oils and fingerprints can leave marks that show up more on light parts.
- Paint and coatings that are not compatible can react with the resin surface.
Cause 9: The Resin Itself
Some resins simply change color more than others.
- Clear resins show yellowing the most, because there is no pigment to hide it.
- White and light colors also show yellowing clearly.
- Low-cost or older formulas may use ingredients that are less stable.
- UV-stable resins use better additives and are designed to resist yellowing.
- Different batches of the same resin can vary slightly.
If color stability matters for your project, check the data sheet and user reviews for notes about yellowing.
Why Liquid Resin in the Bottle Can Change Color Too
Color change does not only happen in cured parts. Liquid resin can also change.
- Light exposure can start slow curing reactions inside the bottle, which may thicken the resin or make it darker.
- Heat speeds up aging.
- Separation of pigments can make the resin look different from the top to the bottom of the bottle. Shake or stir it well before use.
- Contamination from cured bits or other resins can change color and behavior.
Our guide on whether you can mix different brands of 3D printer resin explains why mixing resins can cause color and performance surprises.
Is Color Change Always a Problem?
Not always. It depends on what the part is for.
- Display models and decorative pieces: A slight tint may not matter, or it can be hidden with paint.
- Clear parts: Yellowing is more noticeable and may affect appearance or light transmission.
- Functional parts: Color change can be a sign of aging, and it may come with a loss of strength or flexibility.
- Parts in sunlight or outdoors: Color change is a warning that the material is breaking down.
- Medical or dental parts: Always follow the manufacturer’s rules and standards.
For functional and engineering parts, our guide on the difference between engineering resin and standard resin explains how resin choice affects durability.
How to Reduce Color Change
You cannot stop resin from aging completely, but you can slow it down a lot. Here are practical steps.
1. Choose the Right Resin
- Pick a resin known for good color stability if you need it.
- Look for “UV-stable” or “non-yellowing” claims, and check reviews to see if they are true.
- For clear parts, choose a resin made for clarity.
- Check the data sheet and recommendations from the manufacturer.
2. Cure Correctly, Not Excessively
- Follow the manufacturer’s recommended cure time and method.
- Do not leave parts in the curing station longer than needed.
- Avoid excessive heat during curing. Let parts cool between sessions if the chamber gets hot.
- Cure thicker parts with care, since they may need more time but can also yellow more.
3. Wash Thoroughly with Clean Liquid
- Use fresh or clean IPA or water for the final rinse, depending on your resin type.
- Do not soak parts for too long.
- Dry completely before curing.
Our guide on resin 3D printing safety also covers how to handle and dispose of wash liquid safely.
4. Consider Curing in Water or a Reduced-Oxygen Setup
Some people cure parts submerged in water, or in a covered container, to reduce oxygen exposure and get a smoother surface. This may help some resins. Follow your resin manufacturer’s advice, and test on a spare part first.
5. Store Parts Away from Light and Heat
- Keep finished parts in a drawer, box, or cabinet, rather than a sunny shelf.
- Avoid leaving parts in cars, near windows, or near heaters.
- Use opaque or UV-blocking containers for long-term storage.
6. Use a Protective Coating
A good coating is one of the best defenses against UV.
- UV-protective clear coat sprays can reduce yellowing and fading.
- Paint protects the surface and hides color changes. Use a primer suited to resin, and test for compatibility.
- Clear lacquers and varnishes add a protective layer.
Always test on a spare part first, and choose coatings suited to your use. For clear parts, a UV-blocking clear coat can help keep them from yellowing over time, but it may slightly change the look.
7.Keep Parts Thin Where Possible
Thinner clear parts show less tint, because light passes through less material.
8. Store Resin Properly
- Keep bottles tightly closed and away from sunlight and heat.
- Store them in a cool, dark place.
- Shake or stir before use.
- Filter used resin before returning it to a separate, labeled bottle.
9. Use Fresh Resin for Critical Work
Old, aged resin may already be shifting in color or behavior. For important clear or white parts, use fresh resin.
10. Reduce Contamination
Keep your vat, tools, and wash containers clean. Avoid mixing resins, and filter your resin regularly.
Can You Fix Yellowed Resin Parts?
Once a part has yellowed, you usually cannot reverse it completely, but you can improve how it looks.
- Paint the part. This is the most reliable fix for display models.
- Sand and polish the surface. Light yellowing on the surface may improve if you remove the outer layer.
- Apply a tinted or colored coating to hide the yellow tone.
- Reprint the part, using better curing and storage habits.
Be careful with home remedies that claim to “whiten” resin, since they may weaken or damage the part. Test on a spare piece first, and always follow safety rules when handling chemicals.
Troubleshooting Common Color Problems
My Clear Print Turned Yellow Right After Curing
- Reduce cure time
- Check cure temperature, and let the chamber cool
- Use a resin made for clarity
- Make sure you washed with clean liquid
- Try curing under water, if your resin manufacturer allows it
My Part Turned Yellow After a Few Weeks
- Check where it is stored, and avoid sunlight and heat
- Add a UV-protective coating
- Choose a more UV-stable resin next time
- Avoid over-curing
My White Resin Looks Cream or Yellow
- Reduce curing time and heat
- Make sure the resin is mixed well
- Consider painting the part
- Test a different white resin
Colors Look Faded
- Keep parts out of direct sunlight
- Use UV-protective coatings
- Choose a resin with more stable pigments
- Paint the part for long-term color
The Surface Looks Cloudy or Sticky
- Wash again with clean liquid
- Cure for the recommended time
- Check exposure settings
- Dry parts fully before curing
The Resin in the Bottle Looks Darker or Thicker
- Check how it has been stored
- Keep it away from light and heat
- Stir or shake it well
- Test a small batch before printing important parts
- If it looks separated, cloudy, or lumpy, do not use it for important work
Parts From the Same Resin Have Different Colors
- Check that cure times and conditions are consistent
- Mix the resin well before each print
- Check for different resin batches
- Make sure parts were washed the same way
If prints are also failing, our guide on why resin 3D prints fail can help you find the cause.
Special Cases
Clear and Transparent Parts
Clear parts show every bit of tint. Focus on gentle curing, clean washing, thin sections, and UV-blocking coatings. See our guide on whether resin 3D printing can produce transparent parts for a full process.
White and Light-Colored Models
These are the next most affected. Paint is often the best solution for long-term appearance.
Jewelry Patterns
Color change in castable resin patterns is usually not a problem for casting, but always follow the manufacturer’s curing and handling instructions, since burnout depends on a consistent process. Our guide on post-processing castable resin prints covers this.
Dental Models and Appliances
Dental resins have strict instructions, and color or property changes may matter. Always follow the manufacturer’s rules and the standards of your practice. See our guide on dental model accuracy.
Outdoor Parts
Any resin part left outside will age. If you need long outdoor life, test samples in real conditions, use protective coatings, or consider other materials.
Safety Reminder
Resin and cleaning liquids are chemicals, and UV light can harm your eyes and skin.
- Wear nitrile gloves and eye protection.
- Do not look directly at UV curing lights, and use a covered station.
- Work in a well-ventilated space.
- Store resin in sealed bottles, away from sunlight and children.
- Cure leftover resin and contaminated items before disposal.
- Never pour liquid resin or dirty cleaning liquid down the drain.
Our guide on resin 3D printing safety covers ventilation, gloves, storage, and waste disposal in detail.
Common Mistakes to Avoid
- Over-curing clear and light-colored parts
- Leaving finished parts in sunny windows
- Skipping the final clean rinse
- Washing with dirty IPA or water
- Storing resin in light or heat
- Mixing different resins
- Expecting any resin to stay perfectly clear forever
- Using aggressive chemicals to “clean” yellowed parts
- Applying paint or coatings without testing compatibility
- Ignoring the data sheet recommendations
Quick Checklist to Keep Resin Color Stable
Before printing
- Resin chosen for color stability or clarity
- Resin fresh, well stored, and mixed
- Vat, film, and tools clean
After printing
- Washed with clean liquid
- Dried completely
- Cured for the recommended time, not longer
- Chamber temperature kept reasonable
Protection and storage
- UV-protective coating or paint applied if needed
- Parts stored away from sunlight and heat
- Resin bottles kept closed, dark, and cool
FAQ
Why does clear resin turn yellow?
The main reasons are photoinitiators, over-curing, heat, and UV light breaking down the plastic over time. Clear resin has no pigment to hide the change, so yellowing is more noticeable.
Does all resin turn yellow eventually?
Most resins change color to some degree with UV, heat, and time, but the amount varies a lot. UV-stable resins and good storage slow it down.
Can I stop my resin prints from yellowing?
You cannot stop it completely, but you can slow it a lot. Use the right resin, avoid over-curing, store parts away from light and heat, and use a UV-protective coating.
Does curing time affect color?
Yes. Longer curing and extra heat can cause more yellowing, especially on clear and white resins.
Why did my white resin turn cream-colored?
White resin often shows yellowing clearly. Over-curing, heat, UV, and the resin’s own ingredients can all play a part.
Is color change a sign the part is weaker?
Sometimes. Yellowing can be a sign of aging and may come with brittleness, especially on parts exposed to sunlight for a long time.
Can I reverse yellowing?
Usually not completely. Painting, coating, or reprinting are the most reliable solutions.
Does UV-protective spray work on resin prints?
It can help reduce yellowing and fading. Test on a spare part first, since coatings can slightly change the look.
Why does my resin look different in the bottle than on my print?
Resin color can change during curing, and pigments may look different in liquid and solid form. Lighting and thickness also affect how color looks.
Should I store resin in the dark?
Yes. Store resin in sealed bottles in a cool, dark place to slow aging and avoid unwanted curing.
Conclusion
Resin changes color after UV exposure because UV light keeps driving chemical reactions, first during curing and then slowly over the life of the part. Photoinitiators, over-curing, sunlight, heat, oxygen, fading pigments, and dirty washing can all play a part, and clear and light-colored resins show it the most.
You cannot stop aging completely, but you can slow it down. Choose the right resin, cure for the recommended time without overdoing it, wash with clean liquid, store parts and resin away from sunlight and heat, and protect finished parts with a UV-blocking coating or paint. With a few good habits, your prints will keep their look for much longer.
If you are looking for resins, accessories, or a new printer, explore our range of resin 3D printers and materials at MCast 3D. If you are not sure which resin suits your project, contact our team and we will help you choose.