
Complete Jewelry Casting Workflow with 3D Printing

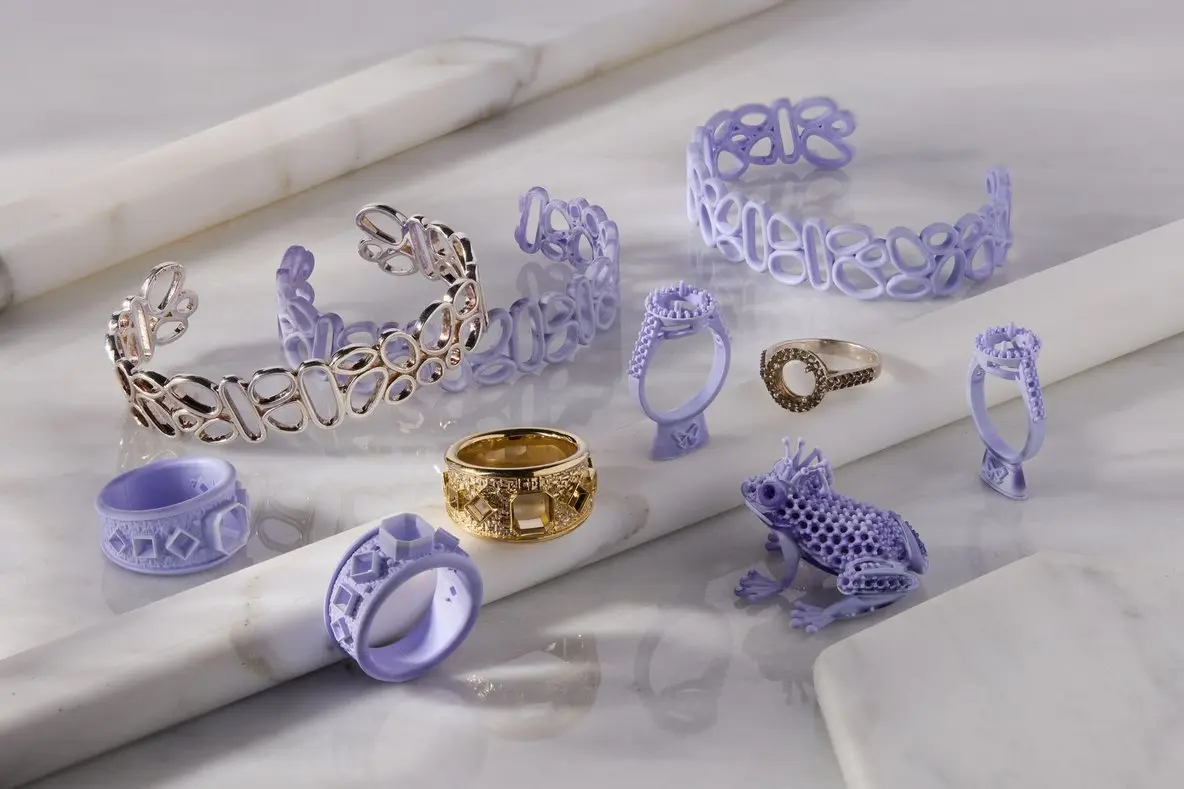
3D printing has changed how jewelers design and produce intricate jewelry. A digital workflow can connect CAD design, resin 3D printing, investment casting, and metal finishing into one streamlined process.
Instead of creating every pattern by hand, jewelers can design a piece digitally and produce a detailed casting pattern with a resin 3D printer.
This approach is particularly useful for custom jewelry, intricate designs, fine details, and repeatable production.
However, successful jewelry casting involves more than printing a model. Each stage affects the final result.
This guide explains the complete jewelry casting workflow with 3D printing, from digital design to the finished metal piece.
What Is Jewelry Casting with 3D Printing?
Jewelry casting with 3D printing combines digital jewelry design with traditional investment casting.
The process starts with a digital jewelry model created in CAD software. A compatible resin 3D printer then produces a physical pattern using castable resin.
The printed pattern becomes part of the investment casting process. During burnout, the pattern is removed from the investment material, leaving a cavity.
Molten metal can then fill this cavity to reproduce the jewelry design.
This workflow is sometimes described as 3D printed jewelry casting or digital investment casting.
The Complete Jewelry Casting Workflow
A typical jewelry 3D printing and casting workflow includes:
- Jewelry design in CAD software
- Design preparation for casting
- Model orientation and support generation
- Resin 3D printing
- Cleaning and post-processing
- Pattern inspection
- Sprue and tree preparation
- Investment
- Burnout
- Metal casting
- Investment removal
- Finishing and polishing
- Final inspection
Each stage requires appropriate equipment, materials, and process settings.
Step 1: Create the Jewelry Design in CAD
The workflow begins with a digital jewelry design.
Jewelry designers can use specialized CAD software to create rings, pendants, bracelets, earrings, and other pieces.
Digital modeling provides greater control over dimensions, proportions, textures, and intricate details.
Design for Casting
A jewelry model should be designed with the casting process in mind.
Very thin features, deep cavities, sharp transitions, and other difficult geometries can create challenges during printing or casting.
The design should also account for metal shrinkage, finishing requirements, stone settings, and the intended casting method.
Designing specifically for casting can reduce problems later in the workflow.
Step 2: Prepare the Model for 3D Printing
Once the CAD model is complete, it must be prepared for resin 3D printing.
The model is imported into slicing software and positioned according to the printer and resin requirements.
Choose the Correct Castable Resin
The resin should match the intended jewelry casting process.
MCast offers jewelry casting materials, MCast Onyx Black and MCast Retroflow Green castable resins.
These materials have different formulations and characteristics, so the choice should depend on the jewelry design and casting requirements.
Set the Correct Printing Parameters
Exposure, layer height, lifting settings, orientation, and supports can affect the quality of the printed pattern.
Start with the manufacturer’s recommended settings for the specific resin and printer.
Exposure calibration is especially important when printing small details, thin walls, and intricate jewelry patterns.
Step 3: Orient the Jewelry Model
Model orientation affects surface quality, support placement, and printing performance.
The goal is to preserve important details while providing enough support for the model.
Place Supports Carefully
Supports should provide stability without unnecessarily damaging visible surfaces.
Support marks can require additional finishing after printing.
For jewelry with delicate details, support placement deserves particular attention.
A poorly supported model can warp, detach, or lose fine details during printing.
Step 4: 3D Print the Jewelry Pattern
After slicing, the resin 3D printer produces the jewelry pattern layer by layer.
A high-resolution resin printer can reproduce fine textures, engravings, filigree, and other small features.
The printer’s resolution is only one part of the process.
Resin selection, exposure calibration, orientation, support placement, and machine condition all contribute to the final pattern.
Step 5: Clean and Prepare the Printed Pattern
The printed pattern contains uncured resin after printing.
It must be cleaned according to the resin manufacturer’s instructions.
Remove Supports Carefully
Remove supports without damaging delicate features.
Inspect areas around prongs, filigree, engravings, and other fine details.
Avoid excessive force when handling thin sections.
Inspect the Pattern
Before continuing, check the pattern for:
- Missing details
- Warping
- Cracks
- Support damage
- Surface defects
- Incomplete curing
- Residual uncured resin
A defective pattern can create problems during later casting stages.
Step 6: Build the Sprue and Casting Tree
The printed jewelry pattern must be connected to a sprue system before investment.
The sprue provides a pathway for molten metal to enter the mold.
The exact sprue design depends on the jewelry shape, metal, casting equipment, and experience of the caster.
Why Sprue Design Matters
Poor sprue placement can affect metal flow and contribute to casting defects.
The sprue should provide an appropriate path for the metal while supporting the pattern during investment and burnout.
Complex jewelry may require a carefully planned tree structure with multiple patterns.
Step 7: Invest the Jewelry Pattern
The sprued pattern is placed inside a casting flask.
Investment material is then mixed and introduced around the pattern.
The investment forms the mold that will eventually contain the molten metal.
Choosing Investment Material
Investment compatibility matters when working with castable resin.
Different resins and investment materials can require different procedures.
Follow both the resin manufacturer’s recommendations and the investment manufacturer’s instructions.
Proper mixing, vacuuming, setting, and drying can also affect the final casting.
Step 8: Burnout the Castable Resin
Burnout is one of the most important stages in the jewelry casting workflow.
The investment flask is heated according to the recommended burnout cycle.
The goal is to remove the printed pattern while maintaining the integrity of the investment cavity.
Why the Burnout Schedule Matters
Castable resins do not all behave the same way during burnout.
A resin formulated for jewelry casting may have a specific heating schedule.
Always follow the recommended burnout procedure for the selected resin and investment material.
Do not use a generic burnout schedule without checking the material and investment requirements.
A properly controlled burnout process helps remove the printed pattern while preserving the mold cavity for metal casting.
Step 9: Cast the Metal
Once the burnout process is complete, the investment mold is ready for casting.
The selected metal is melted and introduced into the mold using the appropriate casting equipment.
Common jewelry metals include:
- Gold
- Silver
- Platinum
- Other suitable jewelry alloys
The casting method depends on the metal, equipment, mold design, and production requirements.
Control the Casting Process
Temperature and metal flow can affect the final result.
The caster must use appropriate settings for the selected alloy and equipment.
Following established casting procedures helps reduce defects and improve consistency.
Step 10: Remove the Investment
After the metal has solidified and cooled according to the casting process, the investment material can be removed.
This exposes the metal casting and attached sprues.
The removal method depends on the investment material and casting setup.
Care should be taken to avoid damaging delicate jewelry features.
Step 11: Cut and Finish the Jewelry
The cast piece is separated from the sprue or casting tree.
The remaining metal requires finishing before the jewelry is ready.
Jewelry Finishing Processes
Depending on the design, finishing can include:
- Sprue removal
- Filing
- Grinding
- Sanding
- Polishing
- Surface finishing
- Stone setting
- Plating
The amount of finishing required depends on the quality of the printed pattern and casting.
A smoother printed pattern can help reduce some finishing work.
Step 12: Inspect the Final Jewelry
The final piece should be inspected before delivery or further processing.
Check the jewelry for:
- Surface defects
- Porosity
- Incomplete casting
- Missing details
- Dimensional problems
- Cracks
- Sharp edges
- Finishing marks
For professional production, inspection should be part of the standard workflow.
Why Use 3D Printing for Jewelry Casting?
Traditional jewelry production remains important, but digital manufacturing provides additional options.
Complex Designs
3D printing can reproduce detailed digital geometries that may be difficult to create manually.
Filigree, textures, engravings, and customized forms can be incorporated directly into the CAD model.
This gives jewelers greater control over intricate designs and detailed casting patterns.
Easy Design Changes
Digital jewelry designs can be modified before printing.
This makes it easier to create different sizes, shapes, and customized versions.
Repeatable Production
Once a design has been properly prepared, the same digital model can be used to produce additional patterns.
This can help jewelry businesses maintain consistency across repeat orders.
Custom Jewelry
Digital jewelry workflows are particularly useful for customized designs.
A customer’s requirements can be incorporated into a CAD model before producing the physical casting pattern.
Choosing a Jewelry 3D Printer
The printer plays an important role in the jewelry casting workflow.
A suitable resin 3D printer should provide the resolution, build volume, and material compatibility required for the intended designs.
Important Printer Features
Consider:
- XY resolution
- Layer height
- Build volume
- Light source
- Printing stability
- Resin compatibility
- Printing speed
- Slicing software
- Replacement parts and maintenance
For intricate jewelry, resolution and printing consistency are particularly important.
Choosing the Right Castable Resin
Castable resin should be selected based on the jewelry design and casting process.
Fine and Intricate Jewelry
Fine filigree, engravings, and delicate structures require a resin capable of reproducing small details.
The resin should also be suitable for the intended investment and burnout process.
Different Jewelry Geometries
Different designs can place different demands on the casting material.
For example, a delicate filigree ring may require different material characteristics from a heavier jewelry piece.
The correct material should be selected according to the printer, design, investment, and casting process.
Understanding Resin Requirements
Castable resins can have different printing, cleaning, curing, investment, and burnout requirements.
Always check the manufacturer’s technical instructions before starting a production job.
Using the correct resin profile and following the recommended casting workflow can help improve consistency.
Common Jewelry Casting Problems
Even a good 3D printing workflow can produce casting problems if individual stages are not controlled.
Failed Resin Print
Possible causes include incorrect exposure, poor support placement, build plate problems, or unsuitable resin settings.
Surface Defects
Surface defects can originate from the CAD model, printing process, support removal, or casting process.
Incomplete Burnout
Incomplete pattern removal can affect the investment cavity and final casting.
Check the resin’s recommended burnout process before changing furnace settings.
Porosity and Casting Defects
Casting defects can have multiple causes.
Metal temperature, sprue design, investment condition, burnout, mold temperature, and casting technique can all affect the result.
Do not assume that a casting defect is caused by the resin alone.
How to Improve Your Jewelry Casting Workflow
Consistent results require control across the entire process.
Calibrate the Printer
Use exposure tests and manufacturer-recommended settings.
Keep the printer and resin within their recommended operating conditions.
Maintain Consistent Post-Processing
Use the same cleaning and preparation process for repeat production.
Document Successful Settings
Record resin profiles, layer heights, exposure settings, burnout cycles, and casting conditions.
This makes successful jobs easier to reproduce.
Inspect Each Stage
Do not wait until the final casting to identify problems.
Inspect the CAD model, printed pattern, spruing, investment, burnout, and final casting.
Finding a problem early can save material and production time.
Complete Jewelry Casting Workflow at a Glance
CAD Design → Model Preparation → Supports → Resin 3D Printing → Cleaning → Inspection → Spruing → Investment → Burnout → Metal Casting → Investment Removal → Finishing → Final Inspection
Each stage contributes to the quality of the final jewelry piece.
Conclusion
A complete jewelry casting workflow with 3D printing combines digital design with established investment casting techniques.
The process starts with a carefully designed CAD model and continues through resin 3D printing, cleaning, spruing, investment, burnout, metal casting, and finishing.
The quality of the final jewelry depends on the entire workflow rather than one piece of equipment or material.
Choosing a suitable jewelry 3D printer, using the correct castable resin, calibrating printing parameters, and following the appropriate burnout process can help create more consistent casting patterns.
For jewelry professionals exploring digital manufacturing, 3D printing provides a practical way to bring detailed and customized designs from the screen into physical production.